
How To Get La Lucky Grande in Steal a Brainrot (March 2026) Ultimate Guide
La Lucky Grande is the brand-new limited Secret brainrot dropped on March 17, , as part of the St. Patrick’s…
After spending countless hours exploring every corner of Orbis and testing different mining strategies, I’ve discovered the most efficient ways to farm Cobalt Ore in Hytale. This crucial mid-tier resource has become my go-to material for crafting powerful equipment, and I’m excited to share everything I’ve learned about finding and farming it efficiently.
Before diving into specific locations, here’s what you need to know about Cobalt Ore in Hytale:
| Aspect | Details |
|---|---|
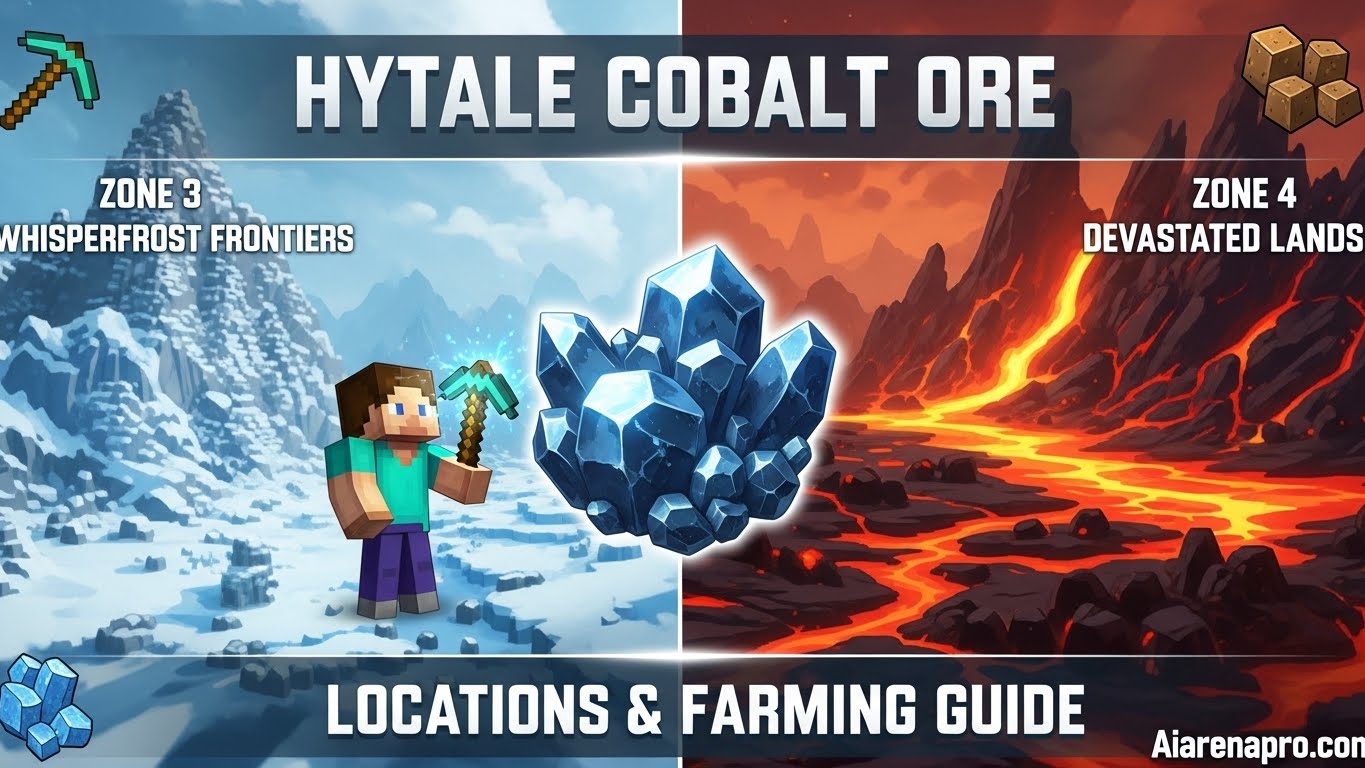
| Primary Locations | Zone 3 (Whisperfrost Frontiers), Zone 4 (Devastated Lands) |
| Appearance | Dark blue/grey ore with distinctive blue-tinted stones |
| Mining Tool Required | Any pickaxe (even Crude Pickaxe works) |
| Best Farming Method | Submerged caves in Zone 3, shallow layer caves in Zone 4 |
| Crafting Uses | Weapons, armor, tools, workbench upgrades, furnace upgrades |
| Difficulty Level | Medium (requires traveling to dangerous zones) |
| Companion Materials | Often found with Iron, Silver, Adamantite |
Unlike the common Iron and Copper ores that you’ll encounter in Zone 1 and 2, Cobalt doesn’t spawn in the starting areas. You’ll need to venture into more challenging territories to collect this valuable resource. Let me walk you through both primary locations where Cobalt spawns abundantly.
The Whisperfrost Frontiers represent your first real opportunity to collect Cobalt in meaningful quantities. This frozen wasteland might seem intimidating at first, but once you understand where to look, you’ll find Cobalt is actually quite abundant here.
When I first arrived in Zone 3, I made the mistake of only checking the tallest, snowiest peaks. While these certainly contain Cobalt, I discovered something interesting: mountains with dirt-covered bases and snow caps at the top often hide the most abundant veins. These transitional peaks are easier to reach early on and tend to have excellent Cobalt deposits.
The Cobalt appears as greyish ore with a subtle blue tint sticking out from mountain faces. From a distance, you might spot a faint blue glow, especially if you’re exploring during twilight hours. I recommend systematically scanning each mountain face as you climb, because Cobalt clusters can be tucked into crevices that aren’t immediately obvious.
Pro tip: Don’t just focus on the fully snow-covered mountains. During one of my mining expeditions, I noticed something shiny on a partially snow-covered peak and discovered a massive Cobalt reserve. These semi-snowy mountains are often overlooked by other players but can yield incredible amounts of ore.
The shale columns scattered throughout Zone 3 are absolute goldmines for Cobalt. These distinctive geological formations contain large veins of Cobalt ore and are relatively safe to mine since they’re above ground. I’ve found that a single shale column can provide enough Cobalt for an entire armor set.
If you’re willing to brave the darkness, Zone 3’s cave networks offer even more Cobalt than surface mining. The icy caves beneath the snowy mountains contain substantial deposits, though the greyish color of Cobalt can make it challenging to spot in dim lighting.
Here’s my strategy for cave mining in Zone 3: always keep your torch equipped and move methodically through each chamber. The Cobalt blends into the stone walls, but once your eyes adjust, you’ll start noticing the subtle color differences. I’ve found that looking for slight blue-grey discolorations on cave walls has helped me spot Cobalt deposits I would have otherwise missed.
This is my absolute favorite location for Cobalt farming in Zone 3. The submerged caves are underwater cave systems that most players overlook, but they’re packed with Cobalt and have minimal mob spawns. You’ll need diving gear to access these locations effectively, but the investment is worth it.
I discovered these caves by accident while exploring the coastline of Zone 3. The entrances are typically found near bodies of water or accessed directly from the ocean. Once inside, you’ll find chamber after chamber filled with Cobalt ore, and because mobs rarely spawn here, you can mine in peace without constant interruptions.
Focus your search on these specific regions for the best Cobalt yields:
The Everfrost: This area features towering ice formations and frozen waterfalls. The Cobalt here tends to cluster around the base of ice spires and within frozen cave systems. I’ve had incredible success mining along the cliff faces in this region.
Frostmarch Tundra: A vast, open tundra with scattered mountains and cave entrances. The surface Cobalt is easier to spot here due to the flat terrain between mountain ranges. I recommend bringing a horse for faster travel between mining spots.
Boreal Reach: This densely forested snow region has numerous cave systems beneath its surface. The trees can make navigation tricky, but the caves here are rich with both Cobalt and Iron deposits.
One critical thing I learned the hard way: Zone 3 transforms at night. Creatures of the Void emerge when darkness falls, making mining extremely dangerous. Always plan your mining expeditions during daylight hours, and if you find yourself caught out at night, seek shelter immediately or use a portal to return to your base.
If Zone 3 is good for Cobalt, Zone 4 is extraordinary. The Devastated Lands are the most dangerous region in Hytale, but they’re also where Cobalt is most abundant. Volcanic ash covers the surface, lava flows are everywhere, and hostile mobs are relentless, but the sheer quantity of Cobalt available here makes it worth the risk.
Unlike Zone 3, where surface Cobalt requires some searching, Zone 4 has Cobalt practically everywhere on the surface. I’ve found massive deposits near bodies of water and lava pools. The trick is learning to spot Cobalt among the dark volcanic rock, where it appears as darker blue-grey formations.
When mining surface Cobalt in Zone 4, always keep an eye on your surroundings. The hostile environment means you can easily get swarmed by mobs if you’re not paying attention. I like to mine in short bursts, clearing the area of threats before committing to extended mining sessions.
Zone 4’s unique multi-layer structure means Cobalt distribution varies by depth. The surface layer has plenty of Cobalt mixed with Adamantite, Iron, and Gold. As you descend one layer, you’ll find smaller, more navigable caves with dense Cobalt concentrations and less lava. Go deeper, and you’ll discover massive caverns with huge Cobalt and Adamantite reserves, plus Silver and Gold.
My favorite farming strategy involves the second layer down. These caves are small enough to navigate safely but large enough to contain substantial Cobalt deposits. The reduced lava presence makes mining much safer compared to deeper layers.
The small caves one layer below the surface are ideal for efficient Cobalt farming. You can find entrances near small bodies of water or access them directly from the ocean. These caves have significantly less lava than deeper levels, making them much safer to explore.
I’ve developed a farming route through these caves that yields hundreds of Cobalt ore per run. The key is marking cave entrances you’ve already cleared so you can return when the ore respawns.
Cinder Wastes: A harsh volcanic desert where Cobalt and Adamantite spawn frequently around lava pockets. Look for blocks with red fragments (Adamantite) and blue-grey formations (Cobalt) near lava sources. I circle lava pools systematically to maximize ore collection.
Charred Woodlands: This eerie region of burnt trees and ash-covered ground has excellent cave systems filled with Cobalt. The surface deposits are less abundant than Cinder Wastes, but the underground networks more than compensate.
Cinder Islands: Specifically mentioned for Adamantite, but I’ve found substantial Cobalt deposits here as well, particularly in the cliffsides and cave systems connecting the islands.
Zone 4 demands respect. I always bring:
The mobs here are aggressive and numerous. I’ve learned to create small fortified positions where I can retreat and heal during intense battles.

After testing countless approaches, I’ve identified the most efficient farming methods for different player situations.
When you first reach Zone 3, focus on surface mining on the semi-snowy mountains. These peaks offer:
I recommend making several short trips rather than one extended expedition. Collect what you can carry, return to base to smelt and store, then head back out. This minimizes risk and ensures you don’t lose everything to a surprise death.
Once you have decent gear, shift to cave mining in Zone 3. The underground deposits are more substantial, and you can handle the occasional mob encounters. My typical farming session involves:
With strong armor and weapons, Zone 4 becomes your primary Cobalt source. I use this route:
For maximum efficiency, I’ve developed this farming circuit:
Zone 3 Segment (20-30 minutes):
Zone 4 Segment (30-40 minutes):
This route typically nets me 200-300 Cobalt ore per full circuit, which is enough for multiple crafting projects.
Solo Farming Advantages:
Group Farming Advantages:
I usually farm solo in Zone 3’s submerged caves and group up for Zone 4 expeditions.
Understanding what to craft with your hard-earned Cobalt helps prioritize your farming efforts.
Cobalt Armor Set:
This represents a significant upgrade from Iron or Copper gear. The defense boost alone makes Zone 4 exploration much more manageable. I crafted my Cobalt armor before seriously farming Zone 4, and the difference was night and day.
Cobalt Weapons:
The damage increase over Iron weapons is substantial. Cobalt weapons let you take down tougher mobs in Zone 3 and 4 with fewer hits, making farming safer and faster.
Workbench Upgrades: Cobalt is required for several workbench upgrades, which unlock new crafting recipes. If you already have Thorium or Adamantite gear, use your Cobalt for these upgrades instead of equipment.
Furnace Upgrade: Upgrading your furnace with Cobalt increases smelting efficiency. This might not seem crucial initially, but when you’re processing hundreds of ore chunks, the time savings add up significantly.
Here’s my recommended crafting order:
Important Note: Cobalt equipment also requires Shadoweave Scraps, which drop from Outlanders in snow biomes. Make sure you’re collecting these while farming Cobalt in Zone 3.
If you somehow acquired Thorium or Adamantite equipment before getting Cobalt gear, skip the Cobalt armor and weapons entirely. Instead, funnel all your Cobalt into workbench upgrades. The resource investment for Cobalt gear isn’t worth it if you already have superior equipment.
These techniques have dramatically improved my Cobalt farming efficiency.
Contrary to what you might expect, you can mine Cobalt with any pickaxe, even the basic Crude Pickaxe you start with. However, using an Iron Pickaxe or better significantly speeds up mining. I tested the difference, and Iron Pickaxe mines Cobalt roughly 40% faster than Crude Pickaxe.
Tool Recommendation: Use at least an Iron Pickaxe for Cobalt farming. The speed increase means you’ll mine more ore before needing to return, maximizing each expedition’s yield.
Running out of inventory space in the middle of a good Cobalt vein is frustrating. Here’s how I manage inventory:
Pre-Farming Setup:
During Farming:
Post-Farming:
Proper lighting transforms cave mining from frustrating to efficient.
Torch Placement:
The initial torch investment pays off by preventing mob spawns and making Cobalt deposits visible against dark cave walls.
Getting lost in Zone 3 or 4 cave systems wastes valuable time and risks death.
Navigation Techniques:
I spent two hours lost in a Zone 4 cave system once. Since implementing these marking strategies, I haven’t gotten lost again.
Fighting mobs eats into mining time, so efficient combat is crucial.
Combat Tips:
In Zone 4, I position my back to a wall before engaging mobs, preventing being surrounded.
Understanding ore respawn helps plan farming sessions.
From my testing, Cobalt ore respawns after approximately 15-20 in-game days in both zones. This means:
I maintain a journal noting which caves I’ve cleared and when, helping me plan efficient farming routes.
Once you’ve mastered basic farming, these advanced strategies will maximize your Cobalt collection.
Setting up forward bases in Zone 3 and 4 eliminates tedious travel time.
Zone 3 Outpost:
My Zone 3 outpost cut my farming time by nearly 30% since I no longer return to my main base after each run.
Zone 4 Outpost:
Zone 4’s danger makes outposts even more valuable. Having a safe haven to retreat to has saved my life multiple times.
Bringing a horse to Zone 3 transforms surface mining.
Benefits:
I keep my horse near the base of whatever mountain I’m mining, using it to quickly move between peaks.
Organized group farming is incredibly efficient when done right.
Roles Assignment:
With a coordinated four-person team, we’ve cleared entire Zone 4 cave systems in under an hour, collecting enough Cobalt for everyone’s needs.
Hytale’s dynamic weather and events affect farming conditions.
Optimal Farming Conditions:
To track my farming improvement, I measure these metrics:
Tracking progress helps identify which strategies work best for your playstyle.
Learn from my errors to avoid these pitfalls.
Early in my Hytale journey, I’d venture into Zone 3 with minimal food, weak armor, and few tools. These unprepared trips usually ended in death and lost progress.
Solution: Always prepare thoroughly before farming expeditions. Check off this pre-mining checklist:
I once tried mining Cobalt while mobs attacked me, thinking I could multitask. I died, lost my inventory, and had to make a dangerous recovery run.
Solution: Always clear the area of mobs before mining. It takes an extra minute but prevents costly deaths.
Zone 4 is already dangerous during the day. At night, it becomes a death trap. I learned this after being overwhelmed by nocturnal mobs during what should have been a routine mining trip.
Solution: Plan Zone 4 expeditions to conclude before nightfall. If caught out at night, find or create a shelter and wait for dawn.
Wasting time checking empty caves you already mined is frustrating. I used to farm the same depleted spots repeatedly before implementing marking systems.
Solution: Use distinctive markers to indicate cleared areas. I place three torches in a triangle pattern at entrances to cleared caves.
Trying to haul every single ore type and material back means you collect less Cobalt.
Solution: Prioritize Cobalt above all else during Cobalt farming runs. Drop less valuable materials if needed.
The deepest Zone 4 layers have incredible Cobalt deposits, but solo players face overwhelming mob pressure. I attempted a deep dive alone and barely escaped with my life.
Solution: Stick to surface and second-layer caves when solo. Reserve deep dives for group expeditions.
I suffered with limited inventory space for far too long before investing in backpack upgrades.
Solution: Prioritize backpack upgrades early. The increased carrying capacity directly improves farming efficiency.
Understanding where Cobalt fits in Hytale’s progression helps plan your crafting path.
Early Tier (Zone 1-2):
Mid Tier (Zone 3-4):
Late Tier (Zone 4+):
Copper (Start): Mine until you have a full set of tools, weapons, and armor. This prepares you for Iron farming.
Iron (Early-Mid): Farm Iron extensively. You’ll need Iron gear for safely exploring Zone 3, and Iron Pickaxes make mining all other ores faster. I recommend having 100+ Iron Ingots before attempting Zone 3.
Thorium/Cobalt (Mid): These are roughly equivalent in power. Thorium is found in some Zone 2 areas and Zone 3, while Cobalt is exclusively Zone 3-4. I farmed Cobalt first because I found Zone 3 more accessible than Thorium locations, but either works.
Adamantite (Late): Only attempt Adamantite farming once you have full Cobalt or Thorium gear. Zone 4’s dangers require quality equipment.
Mithril (End-Game): Requires defeating Zone 4 bosses or exploring the most dangerous areas. This is long-term goal territory.
Cobalt occupies a perfect mid-game position. It’s:
I spent about 10 hours total farming Cobalt across several play sessions, which felt reasonable for the power increase it provided.
No, you don’t need special pickaxes to mine Cobalt. Even a Crude Pickaxe works. However, I strongly recommend using at least an Iron Pickaxe because it mines significantly faster. For armor, wear at least Iron or Copper quality to survive Zone 3 and 4 hazards. Bring a shield, weapons (melee and ranged), and plenty of food for extended farming sessions.
To get Cobalt Ingots, smelt Cobalt Ore in a Furnace. First, craft a Furnace using your Workbench (requires stone and fuel). Place Cobalt Ore in the Furnace along with fuel (coal, wood, or other burnable materials). Each Cobalt Ore smelts into one Cobalt Ingot. The smelting process takes a few seconds per ore.
If you’re upgrading from Copper or Iron, absolutely yes. Cobalt gear provides a massive power boost that makes mid-game content significantly easier. However, if you somehow obtained Thorium or Adamantite equipment first, skip Cobalt gear and use the ore for workbench upgrades instead. Cobalt armor and weapons are excellent mid-game equipment but aren’t worth the resource investment if you already have superior alternatives.
The safest Cobalt farming location is the submerged caves in Zone 3. These underwater cave systems have abundant Cobalt deposits and minimal mob spawns, allowing you to mine in relative peace. You’ll need diving gear to explore them effectively. As a close second, the surface shale columns in Zone 3 offer safe above-ground farming with good Cobalt yields.
Based on my crafting experience, you need approximately 80-100 Cobalt Ore to craft a complete armor set (helm, cuirass, gauntlets, greaves) plus a weapon. This accounts for the Cobalt Ingots required and assumes no prior Cobalt inventory. A single good farming session in Zone 3’s submerged caves typically yields 50-80 ore, so plan for 1-2 focused farming trips to equip yourself completely.
No, Cobalt does not spawn in Zone 1 or Zone 2. You must travel to Zone 3 (Whisperfrost Frontiers) or Zone 4 (Devastated Lands) to find Cobalt. Zone 1 and 2 only contain Copper, Iron, and some other basic resources. This is by design – Cobalt represents the first major progression gate requiring players to venture into more dangerous territories.
Zone 4 has more abundant Cobalt overall, but Zone 3 offers better risk-reward balance for most players. I recommend starting in Zone 3’s submerged caves or surface mountains until you have quality gear, then transitioning to Zone 4’s shallow layer caves. Zone 4 is superior for end-game players who can handle the extreme danger, potentially yielding 2-3x more Cobalt per hour than Zone 3.
Cobalt Ore appears as dark blue to grey ore with distinctive blue-tinted stones sticking out of blocks. In caves, look for greyish formations with subtle blue highlights. On mountain surfaces, Cobalt has a more pronounced blue-grey color that’s easier to spot in natural lighting. Some players report seeing a faint blue glow from Cobalt deposits at certain times of day or in specific lighting conditions.
Yes, Cobalt deposits respawn after approximately 15-20 in-game days (roughly 4-7 real-world days of play). This respawn mechanic encourages rotating between multiple farming locations rather than exhausting one area. I maintain several marked farming spots and cycle through them, ensuring at least one location has fresh Cobalt deposits during each play session.
Both ores are similar in power level and utility. Choose based on accessibility – if you find Zone 3 easier to navigate than Thorium locations, farm Cobalt first. I personally preferred Cobalt because Zone 3’s submerged caves offered low-risk high-reward farming. However, if you discover rich Thorium deposits first, there’s no wrong choice. You can even craft a mixed set (Cobalt armor with Thorium weapons, for example).
Maximize your Hytale experience with these essential guides:
Community Resources:
Cobalt Ore represents one of Hytale’s most satisfying progression milestones. The journey from struggling in Zone 1 with Copper gear to confidently farming Zone 3’s frozen caves demonstrates how far you’ve come. I remember my first Cobalt mining expedition – nervously approaching the Whisperfrost Frontiers, underprepared and uncertain. Now, with the knowledge I’ve shared in this guide, you can avoid my mistakes and farm Cobalt efficiently from the start.
The key takeaways are simple: start with Zone 3’s submerged caves for safe farming, transition to Zone 4’s shallow caves once you have better gear, and always prioritize preparation over speed. Mark your routes, manage your inventory smartly, and respect the dangers of each zone.
Cobalt will serve you well through the mid-game, providing the power necessary to tackle Hytale’s tougher challenges. Whether you’re crafting your first Cobalt sword or upgrading your workbenches, every ingot represents progress toward mastering Orbis.
Bookmark this guide and check back regularly – I’ll update it as I discover new farming techniques and optimal routes. The adventure continues, and there’s always more to learn about Cobalt farming in Hytale!
Good luck out there, and may your pickaxe strike rich Cobalt veins! See you in Orbis.