
Bizarre Lineage Codes (March 2026) Free Stand Arrows
Bizarre Lineage is the hottest new JoJo-inspired Roblox RPG right now, set in the mysterious town of Morioh-cho. You build…
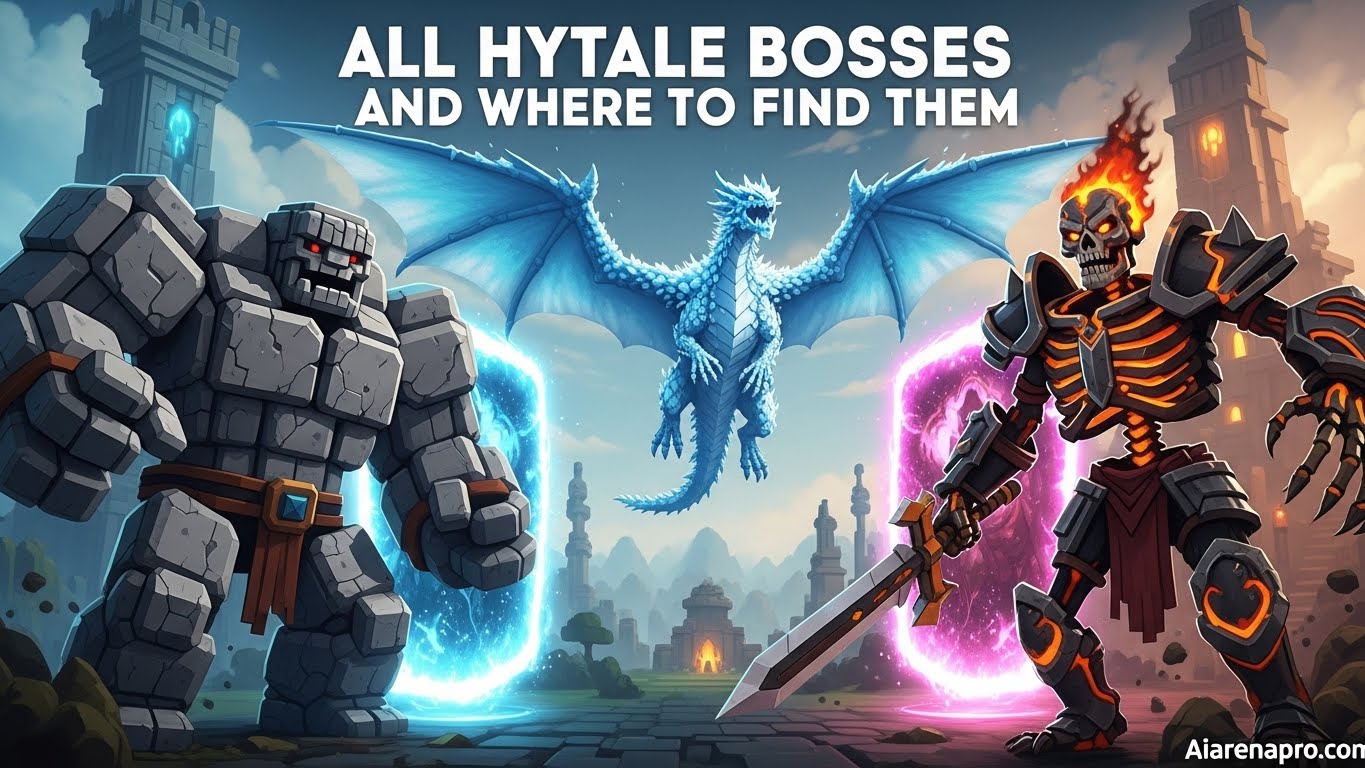
If you’ve been exploring the vast world of Hytale since its early access launch in March 2026, you’ve probably wondered about the powerful boss encounters scattered throughout the game’s zones. As someone who’s spent countless hours battling every confirmed boss and searching for upcoming ones, I’m here to give you the most comprehensive boss guide available.
The boss system in Hytale is completely different from what you might expect if you’re coming from games like Minecraft. Instead of randomly stumbling into these massive creatures while mining or exploring, Hytale uses a structured, progression-based approach that ensures you’re properly geared before facing its deadliest enemies. I’ll walk you through every confirmed boss, show you exactly where to find them, explain how the Ancient Gateway system works, and reveal the upcoming bosses teased in trailers and concept art.
| Boss Feature | Details |
|---|---|
| Total Confirmed Bosses | 6 active bosses in early access, 12+ upcoming |
| Access Method | Ancient Gateways, dungeon exploration, faction camps |
| Difficulty Scaling | Bosses gain 50% HP per additional player |
| Respawn System | Bosses respawn after defeating them |
| Required Preparation | Arcanist’s Workbench, proper gear, potions |
Before diving into individual bosses, you need to understand how Hytale’s boss encounters work. Unlike traditional sandbox games where bosses roam freely or spawn naturally, Hytale gates most boss fights behind specific progression requirements and dedicated combat arenas.
The game uses two primary methods for boss encounters. First, there are dungeon and structure-based bosses that you’ll find while exploring specific locations like Forgotten Temples, Trork Camps, and underground arenas. Second, there are portal-based bosses that require crafting Ancient Gateways at the Arcanist’s Workbench.
This intentional design prevents under-prepared players from accidentally triggering high-difficulty fights they can’t handle. Every boss encounter feels deliberate and story-driven, making each victory significantly more rewarding than random boss spawns.
The Arcanist’s Workbench is absolutely essential for accessing endgame boss content. Without it, you cannot craft Ancient Gateways, which means several major bosses remain completely inaccessible.
Required Materials:
I recommend prioritizing the Arcanist’s Workbench as soon as you reach Zone 2. Thorium requires upgraded mining tools, so make sure you’re using at least Iron or Silver pickaxes. For Linen Scraps, skeleton mobs are your best bet—they’re common, relatively easy to farm, and respawn frequently.
Essence of Void is trickier because it only drops from enemies that spawn at night. I found that setting up a small camp near Zone 2 entrance with plenty of torches for safety, then venturing out at night to hunt crawlers, worked perfectly. Bring healing potions and keep your health above 50% at all times.
Once you’ve crafted the Arcanist’s Workbench, you can create Ancient Gateways. Each gateway requires specific materials and connects to a unique boss region.
Ancient Gateway Crafting Requirements:
After crafting a gateway, place it in an open area and activate it. This opens a portal to a self-contained boss arena with environmental hazards, enemy waves, and the boss itself. These encounters typically only end with victory or defeat, so make sure you’re fully prepared before entering.
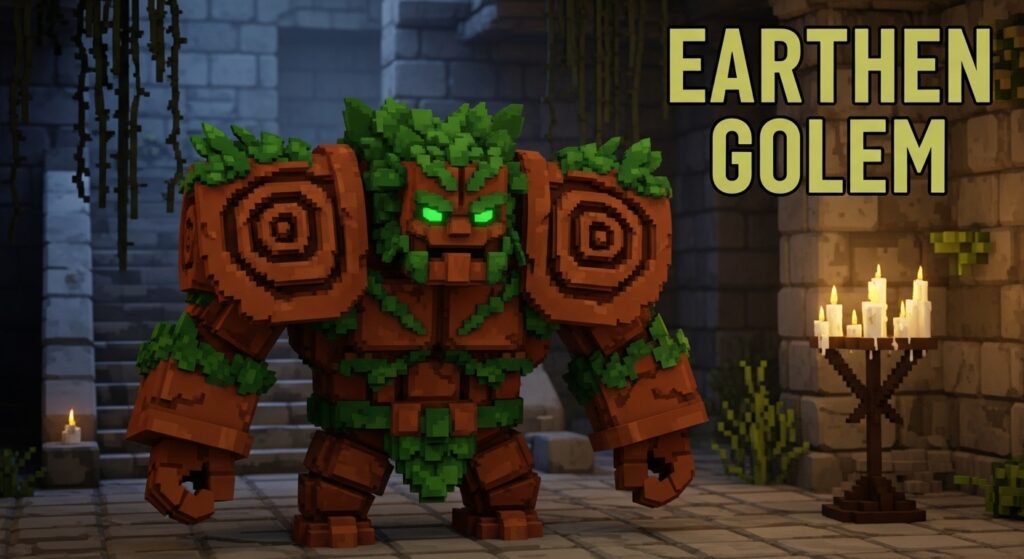
Location: Forgotten Temple basement in Drifting Plains (Emerald Wilds – Zone 1)
Difficulty: Easy | Health: ~3,500 HP | Level Requirement: 5-8
The Earthen Golem is often the first proper boss encounter players face in Hytale. This massive stone guardian blocks the portal inside Forgotten Temples, forcing you to defeat it before progressing further into the game’s content.
Boss Mechanics:
Best Strategy:
I found that keeping distance and using a shortbow or crossbow is the safest approach. The Earthen Golem telegraphs every attack with a long wind-up animation, giving you plenty of time to dodge. If you prefer melee combat, use the hit-and-run tactic: land 1-2 sword strikes, back away before it counterattacks, then repeat.
A shield is incredibly valuable here. Blocking with a shield reduces damage to stamina far more effectively than weapon blocking. Watch for its ground slam attack—when the Golem raises both arms, immediately roll backward or strafe to avoid the shockwave.
Recommended Gear:
Rewards:
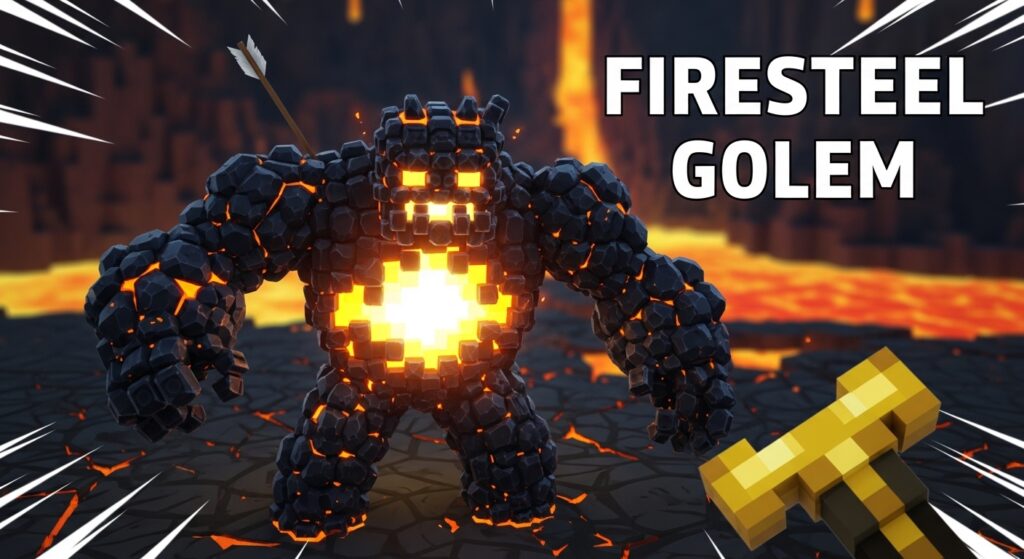
Location: Underground caverns surrounded by lava (Zone 2 and Zone 3)
Difficulty: Medium | Health: ~7,000 HP | Level Requirement: 15-18
The Firesteel Golem is a more aggressive variant of the Earthen Golem, found deep underground on stone platforms surrounded by lava pools. This boss punishes positioning mistakes with instant-death lava knockback.
Boss Mechanics:
Best Strategy:
Arena awareness is critical for this fight. Before engaging, clear the area around the stone platform of any debris and mark safe paths for retreat. Bring Fire Resistance Potions—they’re not optional. A single knockback into lava without fire resistance means instant death.
I recommend staying at medium range using a bow or crossbow. The Firesteel Golem’s flame waves travel in straight lines, so strafing left or right completely avoids them. If you’re using melee, wait for it to finish a combo, rush in for 2-3 hits maximum, then retreat before the next attack sequence.
Recommended Gear:
Rewards:
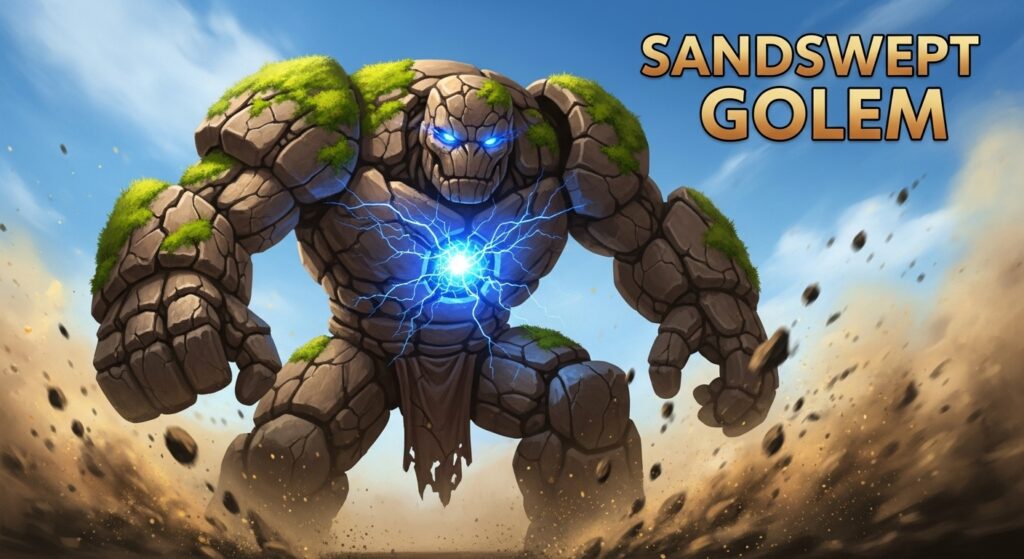
Location: Underground beneath desert temples (behind closed doors)
Difficulty: Medium | Health: ~6,500 HP | Level Requirement: 12-15
The Sandswept Golem guards treasure chambers beneath desert temples. This boss uses sand-based attacks and quicksand mechanics that can immobilize players.
Boss Mechanics:
Best Strategy:
The most dangerous aspect of this fight is the quicksand mechanic. When the Sandswept Golem slams the ground, quicksand patches appear randomly in the arena. Getting caught in quicksand reduces your movement speed by 70%, making you an easy target.
I found that constantly moving in circles around the boss prevents quicksand traps from catching you. During the sandstorm phase, don’t panic—the storm only lasts 8-10 seconds. Use this time to heal and reposition rather than blindly attacking.
Recommended Gear:
Rewards:

Location: Forgotten Temple basement in ice biomes (Zone 3)
Difficulty: Medium-Hard | Health: ~8,000 HP | Level Requirement: 18-22
The Frost Golem is the ice-aligned version of the Earthen Golem, found in frozen regions. This boss applies freezing debuffs that slow attack speed and movement.
Boss Mechanics:
Best Strategy:
Fire damage is your best friend here. Fire-enchanted weapons deal 200% damage to the Frost Golem, cutting the fight duration in half. If you don’t have fire weapons, bring Fire Resistance Potions anyway because the passive freezing aura can stack up quickly.
The boss summons ice adds at 75%, 50%, and 25% health. Don’t ignore these—they deal surprising damage and can overwhelm you if left unchecked. I recommend clearing adds immediately when they spawn, then returning focus to the boss.
Recommended Gear:
Rewards:

Location: Overworld arena surrounded by stone walls, metal bars, and spikes with green-flame braziers
Difficulty: Hard | Health: ~10,000 HP | Level Requirement: 20-25
The Burnt Skeleton Praetorian is an undead warrior boss with advanced combat mechanics and multiple attack phases. This boss tests both your defensive and offensive capabilities.
Boss Mechanics:
Best Strategy:
This boss has the most complex attack patterns of any early access boss. The Praetorian uses actual sword combos rather than single attacks, meaning you need to dodge or block multiple times in succession.
I learned to recognize the combo patterns: horizontal slash, vertical slash, ground stab. After the third attack, there’s a 2-second opening for counterattacks. Don’t get greedy—land your hits and immediately prepare to block the next combo.
When the Praetorian enters rage mode at 30% HP, its attack speed doubles. This is where most players die. Switch to pure defensive play, prioritize dodging over attacking, and only strike during major openings like after the shield bash.
Recommended Gear:
Rewards:
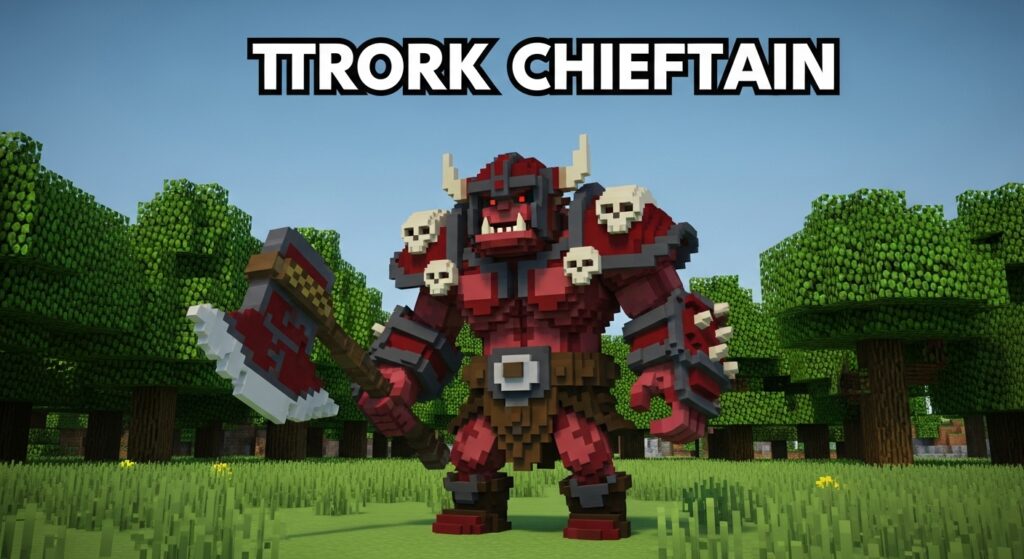
Location: Trork Camps in Emerald Grove (Zone 1), enclosed by walls with watchtowers
Difficulty: Easy-Medium | Health: ~5,000 HP | Level Requirement: 10-13
The Trork Chieftain serves as a faction leader boss, found in heavily fortified Trork encampments. This boss is designed as a skill-check for players before advancing to Zone 2.
Boss Mechanics:
Best Strategy:
The Trork Chieftain has high damage but slow attack speed, making it perfect for learning dodge timing. When the Chieftain raises its axe above its head, you have roughly 1.5 seconds to dodge. Rolling to the side works better than backing up because the axe has surprising forward range.
The battle cry summons 3-4 regular Trorks. You have a choice here: either kite the adds while focusing the Chieftain, or quickly eliminate the adds first. I prefer killing adds immediately because they interrupt your attack rhythm if left alive.
Recommended Gear:
Rewards:
Based on official trailers, concept art, and datamined information, these bosses are expected to arrive in future Hytale updates.
Expected Location: Dragonspire Weald dimension (portal-based encounter)
Current Status: Present in early access creative mode but inactive in survival
The Frost Dragon currently exists in the game files and can be found in Dragonspire Weald if you use creative mode or specific console commands. However, the boss does not attack or have active mechanics yet.
To access the Frost Dragon location, you need to craft an Ancient Gateway using the Arcanist’s Workbench, then use the Fragment Orbis – Dragonspire Weald item on it. This requires completing approximately 100 memories first.
Once in Dragonspire Weald, navigate to the frozen biome area with ice pillars forming a circular arena. The dragon rests at the summit but remains dormant. When this boss becomes active, I expect it to feature aerial combat, freezing breath attacks, and multi-phase mechanics similar to the theoretical Inferno Dragon.
Expected Mechanics:
Expected Rewards:
Expected Location: Scarak Nests in Zone 2 (Howling Sands)
The Broodmother is a hive-based boss confirmed through multiple sources. As the queen of the Scarak faction, this boss continuously spawns minions throughout the fight, creating a swarm combat experience.
Expected Mechanics:
Strategy Predictions:
Based on the boss design, I expect fire-based weapons and crowd control to be essential. The constant minion spawning means you’ll need to balance DPS on the boss with add management. Area-of-effect attacks should be prioritized for this fight.
Expected Rewards:
Expected Location: Frozen mountains and snow-covered peaks in Zone 3
The Yeti was prominently featured in the original Hytale announcement trailer, showing it hurling massive boulders at players. This boss appears to be an outdoor mountain encounter rather than a dungeon-based fight.
Expected Mechanics:
Strategy Predictions:
The Yeti fight will likely emphasize positioning and environmental awareness. The boulder throws can be dodged but require reading attack patterns. I expect the avalanche mechanic to be a major threat, potentially requiring players to find safe zones during specific phases.
Expected Rewards:
Expected Location: Forgotten Jungle in Devastated Lands (Level 4)
The Cave Rex is one of the most unsettling boss possibilities discovered in the current early access version. This dinosaur-like creature features bio-luminescent traits that can lure unprepared players into danger.
Current Status: Present in game but not confirmed as boss encounter
I found the Cave Rex in the Forgotten Jungle using console commands. The creature has extremely long detection range compared to normal mobs, making it dangerous even when you’re trying to observe it from distance.
Expected Mechanics:
Strategy Predictions:
Given its detection range and aggressive nature, I expect this boss to require stealth approaches or extremely strong gear. The bio-luminescent aspect suggests it might be a cave or underground boss, making light source management critical.
Expected Rewards:
Void Dragon: Teased in concept art, likely an endgame void-themed dragon encounter
Kraken: Ocean-based boss requiring boat combat, mentioned in datamined files
Outlander Colossus: Giant humanoid boss from the Outlander faction
Sand Empress: Desert region boss ruler, possibly Zone 2 endgame
Corrupted Golem: Void-corrupted version of standard golems
Outlander Chief: Faction leader boss similar to Trork Chieftain
Kyros: Named boss from official promotional materials
Unnamed Giant Skeleton: Massive undead boss seen in trailers
Unnamed Undead Knight: Heavily armored skeletal warrior boss
Void Spider: Large spider boss aligned with void corruption
Learn Attack Patterns: Every boss in Hytale telegraphs their attacks with specific animations. The “tell” period before an attack is your opportunity to prepare dodges or position yourself safely. I spent time in each boss fight specifically watching patterns before committing to aggressive strategies.
Don’t Button Mash: Patient players win boss fights in Hytale. Each boss has specific windows after attacks where they’re vulnerable. Attacking randomly outside these windows puts you at risk of getting hit mid-swing. Wait for clear openings, land your hits, then prepare for the next attack cycle.
Potions Are Mandatory: Unlike normal mob encounters, bosses require proper preparation. Healing Potions, Strength Potions, and resistance potions specific to boss mechanics (Fire Resistance for Firesteel Golem, etc.) are not optional. Budget at least 10-15 potions per boss attempt.
Co-op Scaling: Bosses gain 50% health per additional player, but boss fights become significantly easier in groups. The revive mechanic alone makes co-op worth it. A friend can resurrect you mid-fight, giving you second chances that solo players don’t have.
Manual Saves: Always manual save (F5 key) before entering boss arenas. If you die, you can reload without losing gear or progress. This is especially important for portal-based bosses where death might kick you back to the overworld.
Before attempting any boss fight, make sure you have:
✓ Armor upgraded to recommended tier or higher
✓ Weapon appropriate for boss type (fire for ice bosses, etc.)
✓ Shield for melee builds
✓ 10-15 Healing Potions minimum
✓ Boss-specific resistance potions
✓ Food stack of 15+ for passive regeneration
✓ Backup weapon in case primary breaks
✓ Manual save before entering arena
✓ Empty inventory space for rewards
Early Bosses (Zone 1):
Mid-Game Bosses (Zone 2):
Late-Game Bosses (Zone 3+):
Mistake 1: Underestimating Early Bosses
I’ve seen countless players assume the Earthen Golem is easy because it’s the first boss. Then they attempt it with copper gear and minimal potions, only to get destroyed. Even early bosses require proper preparation.
Mistake 2: Fighting Without Resistance Potions
Boss-specific resistance potions reduce damage by 40-60% for relevant attack types. Fighting the Firesteel Golem without Fire Resistance means taking triple damage from burn effects. These potions aren’t suggestions—they’re requirements.
Mistake 3: Not Managing Stamina
Stamina management is critical for dodge rolling and blocking. If you spam dodge rolls unnecessarily, you’ll have no stamina left when you actually need to avoid a major attack. I learned to only dodge when absolutely necessary, preserving stamina for emergency situations.
Mistake 4: Ignoring Add Spawns
Bosses that summon adds (Trork Chieftain, Frost Golem) become exponentially harder if you ignore the spawned enemies. Always prioritize eliminating adds immediately, then return focus to the boss.
Mistake 5: Poor Arena Awareness
Many boss arenas have environmental hazards like lava, quicksand, or cliffs. Players who tunnel-vision on the boss often dodge directly into hazards. I make a habit of checking my surroundings every few seconds, especially during intense moments.
Press M to open your map. Large icons, unique markers, and special symbols typically indicate boss locations or dungeons. Here’s what to look for:
Temple Icons: Usually indicate Forgotten Temple locations with golem bosses
Skull Markers: Often mark dangerous areas with boss encounters
Faction Symbols: Mark camps where faction leader bosses spawn
Question Marks: Unexplored areas that might contain boss locations
Certain structures visually indicate boss presence even from distance:
Forgotten Temples: Large stone structures with distinctive architecture, always contain Earthen or Frost Golems
Trork Camps: Wooden walls, watchtowers, and campfires visible from afar, home to Trork Chieftain
Desert Temples: Pyramid-like structures partially buried in sand, hide Sandswept Golems
Underground Arenas: Stone platforms surrounded by lava or other hazards, host elemental golems
Spike Arenas: Stone walls with metal bars and spikes indicate Burnt Skeleton Praetorian location
For bosses like the Frost Dragon, you need the Ancient Gateway system:
Each boss dimension is self-contained with unique environments, hazards, and themed enemies leading to the main boss encounter.
Yes, Hytale currently features 6 confirmed bosses in the early access version: Earthen Golem, Firesteel Golem, Sandswept Golem, Frost Golem, Burnt Skeleton Praetorian, and Trork Chieftain. Additionally, at least 12 more bosses have been teased through trailers, concept art, and datamining, including the Frost Dragon, Broodmother, Yeti, and Cave Rex. The game’s Adventure Mode, when released, will likely add even more boss encounters tied to story progression.
Boss fights are unlocked through two main methods. First, dungeon and structure-based bosses like the Earthen Golem and Trork Chieftain are found by exploring specific locations marked on your map. Second, portal-based bosses require crafting an Arcanist’s Workbench using Thorium, Linen Scraps, and Essence of Void, then creating Ancient Gateways to access boss dimensions. Some bosses require completing specific progression milestones or memory collections before access is granted.
Currently, the Burnt Skeleton Praetorian is considered the most difficult early access boss due to its complex combo system, shield mechanics, and rage mode at low health. Among confirmed upcoming bosses, the Frost Dragon is expected to be the hardest encounter when fully implemented, featuring three-phase combat, aerial attacks, and requiring endgame gear to defeat successfully.
Yes, all bosses can be defeated solo, but the difficulty is significantly higher. Bosses gain 50% health per additional player in co-op, but the revive mechanic and ability to coordinate attacks make group fights easier overall. For challenging bosses like the Burnt Skeleton Praetorian or upcoming Frost Dragon, I strongly recommend bringing 2-3 friends unless you have optimal gear and mastered attack patterns.
Yes, bosses respawn after being defeated. The respawn timer varies by boss type, with most respawning after 24-48 in-game hours. This allows players to farm boss-specific materials and rewards multiple times. Portal-based bosses accessed through Ancient Gateways can be re-challenged by creating a new gateway and activating it again.
The best weapons depend on the specific boss you’re fighting. For elemental bosses, use opposing element weapons (fire weapons for Frost Golem, ice weapons for fire-based bosses). For general boss fighting, fully upgraded Gold Swords provide the best balance of damage and durability. Ranged players should prioritize Crossbows over Shortbows for boss fights because crossbows deal higher per-shot damage, which is more important than fire rate against high-health targets.
To craft the Arcanist’s Workbench, you need Thorium x10 (mined in Zone 2 and Zone 3 underground), Linen Scraps x8 (dropped by skeleton enemies), and Essence of Void x5 (dropped by dark-aligned night creatures). Gather these materials, then use a standard Workbench to craft the Arcanist’s Workbench. This unlocks advanced crafting recipes including Ancient Gateways required for portal-based boss encounters.
The Frost Dragon is present in the game files and can be found in Dragonspire Weald using creative mode or console commands, but it is not active in normal survival gameplay. The dragon currently remains dormant and does not attack or have functional boss mechanics implemented. Hypixel Studios is expected to activate this boss in a future update, likely tied to the Adventure Mode release.
Earthen Golem: Level 5-8 | Trork Chieftain: Level 10-13 | Sandswept Golem: Level 12-15 | Firesteel Golem: Level 15-18 | Frost Golem: Level 18-22 | Burnt Skeleton Praetorian: Level 20-25. These recommendations assume you have appropriate gear for your level. Under-leveled players can still defeat bosses with superior skill and preparation, but the difficulty increases significantly.
The Cave Rex is located in the Forgotten Jungle section of the Devastated Lands (Level 4). Currently, this creature is accessible using console commands or creative mode exploration, but it’s unclear whether it’s confirmed as an official boss encounter. The Cave Rex has extremely long detection range and aggressive behavior, making it dangerous even during observation attempts. Full boss mechanics have not been implemented yet.
Now that you know everything about Hytale’s boss system, you’re ready to tackle these challenging encounters. Remember that preparation is half the battle—proper gear, potions, and understanding boss mechanics will carry you farther than raw skill alone.
The boss roster will continue expanding as Hytale receives updates throughout its early access period. I’ll be updating this guide whenever new bosses are discovered or activated, so bookmark this page and check back regularly for the latest information.
Which boss are you most excited to fight? Let me know in the comments below, and feel free to share your own boss fighting strategies and tips with the community!