How to Get Gold Seeds in Grow a Garden 2 (June 2026) Ultimate Guide
Gold Seeds are one of the most valuable pickups in Grow a Garden 2, and unlike the original game, you…
Choosing the wrong class in Survive Zombie Arena (Roblox) can mean the difference between making it past Day 100 or getting wiped on Night 3. I’ve tested all 11 classes, combed through community rankings, and compiled the most up-to-date tier list for June 2026, so you know exactly where to spend your hard-earned Emeralds.
Here’s a quick-glance summary before we dive deep:
| Tier | Classes |
|---|---|
| S | Necromancer, Soldier, Assassin |
| A | Hunter, Engineer, Scavenger |
| B | Medic, Guardian |
| C | Fighter, Policeman |
| D | Survivor |
Necromancer is the #1 solo class; Soldier is the best all-rounder; Engineer is the MVP for team play. Save your Emeralds for S-tier unlocks.
Before ranking, here’s what you need to know about how classes function:
These are the classes that carry runs. If you want to survive past Wave 50+, these are your go-to picks.
| Detail | Info |
|---|---|
| Starter Tools | None |
| Cost | High (most expensive class) |
| Best For | Solo play, long runs |
Perks:
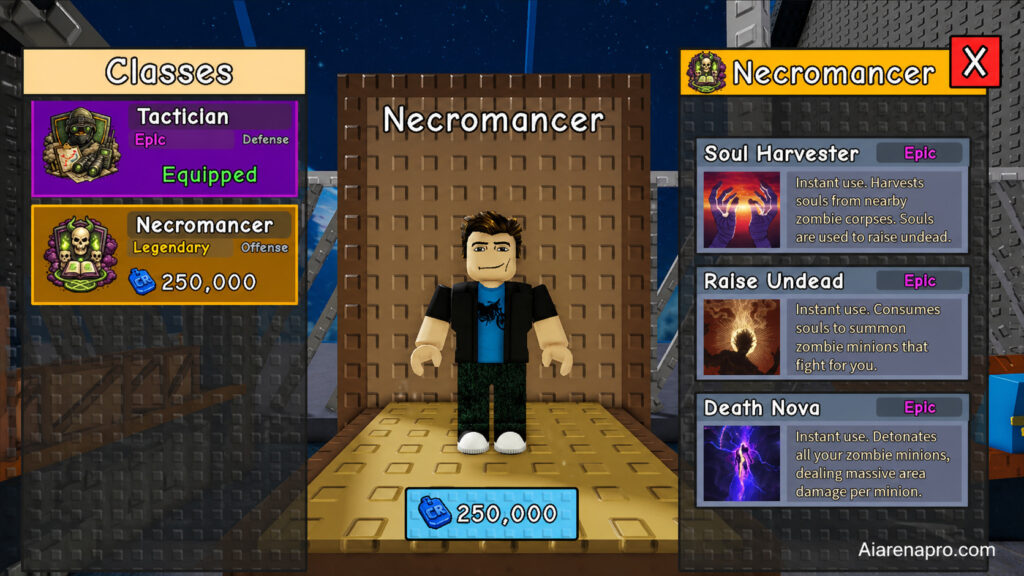
Why is Necromancer S-tier? It literally turns your enemies into your army. Every zombie wave becomes a recruitment drive — and at Level 3, you’re fielding a buffed undead squad every two minutes. The downside: it starts with zero gear, so you’ll need to scavenge fast in the early days. It also cannot reanimate boss-type zombies like Brutes or the Experiment.
Pro tip: Use Call of the Dead on the strongest dead zombies near you for maximum damage output from your undead army.
| Detail | Info |
|---|---|
| Starter Tools | 1x AK-47, 100x Medium Ammo |
| Cost | High |
| Best For | Solo and team DPS |
Perks:
The Soldier is the most consistent damage dealer in the game. You start Day 1 with an AK-47 and 100 rounds that’s an immediate advantage over classes that begin with nothing. The perk tree stacks reload speed, accuracy, and fire rate into a compounding DPS buff that scales beautifully into mid and late game. Less expensive than Necromancer, and arguably safer for newer players.
| Detail | Info |
|---|---|
| Starter Tools | 1x Rifle, 3x Suppressor, 20x Long Ammo |
| Cost | High |
| Best For | Experienced players, solo play |
Perks:
The Assassin is a glass cannon for skilled players. The reduced aggro range lets you sneak through zombie clusters without triggering hordes, great for completing reactor objectives. Level 3’s headshot damage bonus rewards precision aim with devastating burst potential. That said, the -20 Max HP penalty at Level 2 makes mistakes costly.
Pro tip: The Assassin spawns with 3 Suppressors, use one, save one for the Assassin Survivor NPC if it spawns, and keep one as backup.
Starter Tools: 1x Rifle, 5x Bear Trap, 30x Long Ammo
Perks:
Bear traps are already solid tools, the Hunter transforms them into lethal, self-replenishing kill zones. Your traps one-shot normal zombies with the Level 1 buff, and they reset themselves without any input from you at Level 2. Level 3’s slow debuff adds excellent kiting potential. The weakness: no direct weapon damage buff, which limits Hunter’s performance during Brute/Experiment encounters.
Starter Tools: 2x Turret
Perks:
Starting with two turrets is a massive early-game advantage — turrets normally take time to unlock and are capped at eight. The Engineer’s entire perk tree buffs all buildings placed by the Engineer specifically, so your turrets, walls, and other structures become significantly tougher and hit harder. This class is arguably the best in the game for coordinated team runs. For solo play, the lack of personal combat bonuses holds it back slightly from S-tier.
Important: Only buildings placed by the Engineer receive the perk buffs — always let the Engineer set up base structures.
Starter Tools: 1x Knife
Perks:
The Scavenger is cheap to unlock and provides immediate value. Free ammo drops on every direct kill keep you resourced during the early game when supplies are scarce. Level 3’s wall-highlight for items is genuinely powerful for fast loot runs during the day phase. Sprint speed only activates at full health, which limits its combat usefulness, but for looting-focused playstyles, Scavenger punches well above its cost.
The Medic’s entire kit revolves around healing teammates. In a coordinated squad, the Level 3 buff that triggers on heals can swing fights dramatically. Solo, almost every perk is useless. One of the best classes in a team; one of the weakest in solo play.
The Guardian is the tankiest class available. Taunt is the standout ability; use it to pull zombie hordes away from your generator or into chokepoints loaded with bear traps or turrets. The Riot Shield blocks most projectiles (not Experiment shots or Sniper Raiders). The trade-off: mediocre damage output means you survive but rarely lead kills.
Strong early-game melee output. The Fire Axe one-shots normal zombies with the Level 1 buff, and the Katana is effective if you don’t have a chainsaw. The -20% accuracy penalty at Level 1 cripples your ranged damage, a serious liability as the game progresses and ranged combat dominates. Also struggles heavily against Brutes, Experiments, and Bandit Raids.
Budget-friendly and effective in the opening days. The problem: every single perk only applies to pistols. Once you’re using AKs, Rifles, or better weapons, this class becomes dead weight. Good for absolute beginners saving Emeralds.
The Survivor is the free starter class and it shows. No gear, no damage bonuses, and perks focused on basic survival mechanics that other classes handle far better through offensive power. The one-time “survive a lethal hit” perk at Level 3 sounds useful but doesn’t justify running this class over any paid alternative.
| Tier | Class | Solo | Team | Cost |
|---|---|---|---|---|
| S | Necromancer | ⭐⭐⭐⭐⭐ | ⭐⭐⭐⭐ | High |
| S | Soldier | ⭐⭐⭐⭐⭐ | ⭐⭐⭐⭐⭐ | High |
| S | Assassin | ⭐⭐⭐⭐ | ⭐⭐⭐ | High |
| A | Hunter | ⭐⭐⭐ | ⭐⭐⭐⭐ | Medium |
| A | Engineer | ⭐⭐⭐ | ⭐⭐⭐⭐⭐ | Medium |
| A | Scavenger | ⭐⭐⭐⭐ | ⭐⭐⭐ | Low |
| B | Medic | ⭐⭐ | ⭐⭐⭐⭐ | Medium |
| B | Guardian | ⭐⭐⭐ | ⭐⭐⭐ | Medium |
| C | Fighter | ⭐⭐ | ⭐⭐ | Low |
| C | Policeman | ⭐⭐ | ⭐⭐ | Low |
| D | Survivor | ⭐ | ⭐ | Free |
The Necromancer is the best solo class thanks to its ability to convert killed zombies into allies and summon up to 10 undead on demand. For team play, the Soldier and Engineer are the strongest combination due to consistent DPS and powerful base buffs.
You earn Emeralds by joining the Rubicon Community for daily in-game claims, completing one-time badge tasks, signing up for game update notifications, and opening chests or finishing daily quests. Robux can also be exchanged for Emeralds directly in the UI.
The Engineer outperforms the Medic in most team compositions because its turret and building buffs benefit every wave, while the Medic’s perks only activate when teammates are actively taking damage and need healing. However, on high-difficulty runs (Blood Moon, Day 80+), a Medic becomes near-essential.
No, your class is selected before a run begins, and you cannot change it during that session. You must start a new run to use a different class. This makes your class selection one of the most important decisions in each run.
The Survivor is generally considered the weakest class since it offers no combat bonuses, starts with no equipment, and its survival-focused perks are outclassed by nearly every other option. The Hunter is also frequently cited as the weakest combat class due to its lack of direct weapon damage buffs.