
Anime Last Stand Tier List (December 2025) Best Units Ranked
Welcome to the most comprehensive Anime Last Stand tier list you’ll find anywhere! I’ve spent countless hours analyzing every unit…
Minecraft’s Copper Age update has revolutionized storage with the introduction of copper chests a brand new storage block that works seamlessly with copper golems to automate inventory management. If you’ve been wondering how to craft these innovative chests and maximize their potential in your world, you’ve landed in the right place.
I’ve spent countless hours testing copper chests since they were added in the latest update, and I’m excited to share everything you need to know about crafting, using, and optimizing these game changing storage blocks.
| Feature | Details |
|---|---|
| Storage Capacity | Same as regular chest (27 slots) |
| Crafting Materials | 1 Chest + 8 Copper Ingots |
| Special Feature | Works with Copper Golems for automated sorting |
| Oxidation | Yes 4 stages (can be waxed) |
| Double Chest | Yes can be combined |
| Mining Tool | Stone Pickaxe or better |
A copper chest is a specialized storage block introduced in Minecraft’s Copper Age update that combines traditional storage functionality with automation capabilities. Unlike regular wooden chests, copper chests undergo oxidation over time and serve as input containers for copper golems to organize your items.
The beauty of copper chests lies in their synergy with copper golems. When you place items inside a copper chest, nearby copper golems automatically retrieve them and store them in matching regular chests throughout your base creating an automated sorting system that transforms cluttered storage rooms into organized warehouses.

Here’s something crucial that caught me off guard initially: the copper chest crafting recipe is locked until you create your first copper golem. This is a unique mechanic that Mojang implemented to encourage players to explore the full copper ecosystem.
When you spawn your first copper golem in Minecraft, a copper chest automatically generates beneath it. Once you break and pick up this chest, the recipe unlocks permanently in your crafting book.
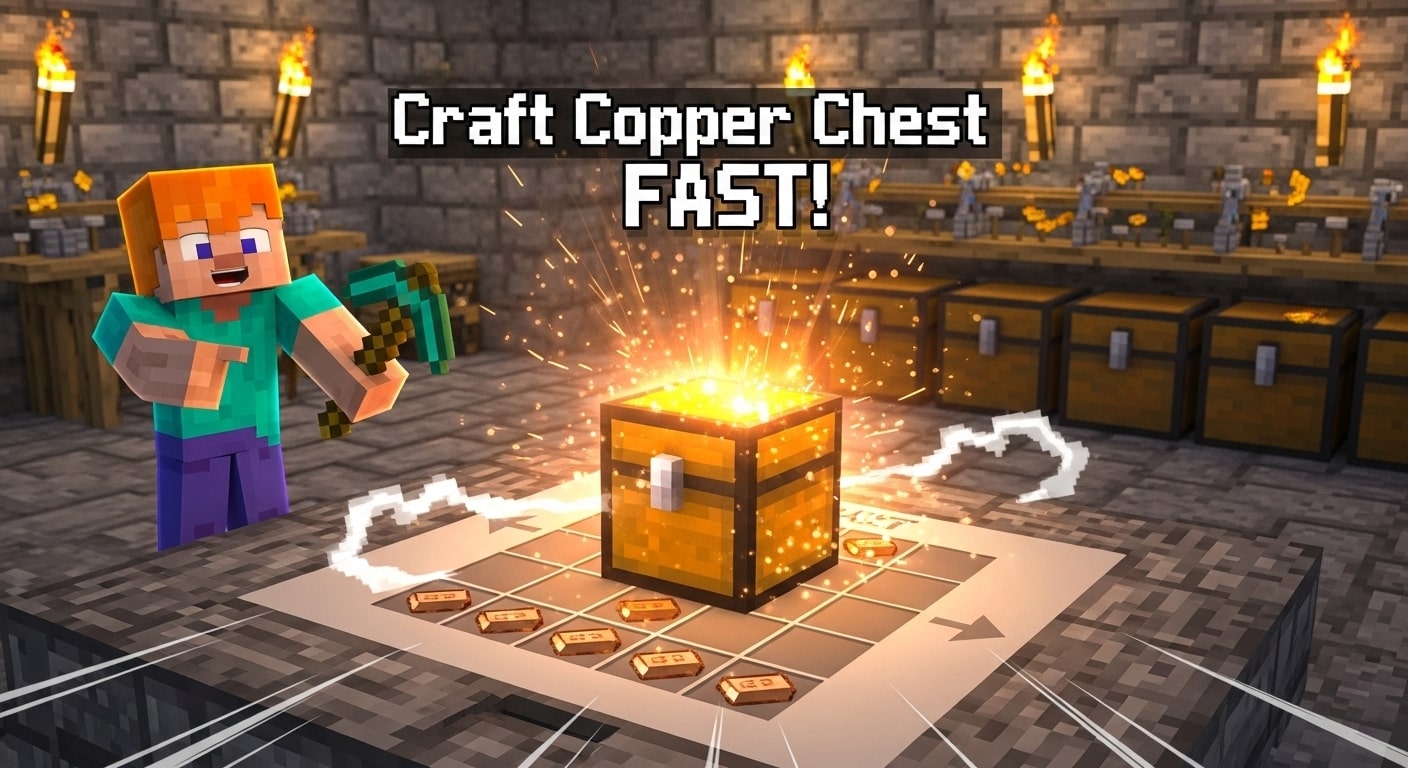
To craft a copper chest, you’ll need:
1. Regular Chest
2. Eight Copper Ingots
3. Crafting Table
Now that you have the materials, here’s exactly how I craft copper chests every time:
Step 1: Access Your Crafting Table Place your crafting table on the ground and right click (or use your interact button) to open the 3×3 crafting grid.
Step 2: Position the Chest Place your regular chest in the center cell of the crafting grid. This is the foundation of your copper chest.
Step 3: Surround with Copper Ingots Fill all eight surrounding cells with copper ingots. The pattern should look like a frame around the chest copper ingots in every slot except the middle.
Step 4: Collect Your Copper Chest The copper chest appears in the result slot on the right. Click and drag it into your inventory. Congratulations you’ve crafted your first copper chest!
[Copper] [Copper] [Copper]
[Copper] [Chest]  [Copper]
[Copper] [Copper] [Copper]

There’s actually another way to obtain copper chests without crafting them directly by creating copper golems. Every time you spawn a copper golem, a copper chest materializes at the location of the copper block you used.
How to Get a Free Copper Chest:
This method is particularly useful when you’re setting up multiple sorting stations throughout your base. I often use this technique to strategically place copper chests exactly where I need them while simultaneously adding helpful copper golems to manage that area.
Important Note: Copper chests only spawn when you manually place the pumpkin/jack o’lantern. Using spawn eggs or the /summon command won’t generate a chest.
Before we dive deeper, let me share a critical tip about mining copper chests: always use a stone pickaxe or better.
| Tool Quality | Result |
|---|---|
| Stone Pickaxe or Better | Drops chest block + all contents |
| Wooden Pickaxe | Contents drop, chest disappears |
| No Tool/Hand | Contents drop, chest disappears |
When I first started using copper chests, I made the mistake of breaking one with my hand I lost the chest itself but thankfully the items inside scattered on the ground. Learn from my error and always carry a proper pickaxe when rearranging your storage areas.
One of the most fascinating aspects of copper chests is their oxidation behavior. Just like other copper blocks in Minecraft, copper chests gradually change appearance over time.
Stage 1: Unoxidized (Normal)
Stage 2: Exposed
Stage 3: Weathered
Stage 4: Oxidized
The oxidation process occurs gradually and randomly. In my experience, copper chests placed outdoors oxidize faster than those stored in enclosed buildings. Each stage takes approximately:
The exact timing varies based on random tick mechanics, but expect the full oxidation cycle to complete over several Minecraft sessions.
Want to preserve that beautiful bright copper color? I always keep honeycombs handy for this exact purpose.
How to Wax Copper Chests:
Removing Wax:
I typically wax copper chests in my main storage room to maintain aesthetic consistency, while letting outdoor chests oxidize naturally for that weathered, lived in look.
Even if your copper chest has fully oxidized, you can restore it to any previous stage:
Method 1: Lightning Strike
Method 2: Axe Scraping (Reliable)
While copper chests function as standard storage blocks, their true potential shines when integrated with copper golems for automated inventory management.
At their core, copper chests work identically to regular wooden chests:
I use copper chests just like regular chests for general storage, but their real magic happens with automation.
This is where copper chests become absolutely game changing. When you combine copper chests with copper golems, you create an automated sorting system.
How the Sorting System Works:
The beauty of this system is its hands off nature. I often go mining or exploring, dump all my resources into a copper chest when I return, and let my copper golems organize everything while I handle other tasks.
Automatic Farm Sorting:
Mining Return Station:
Mob Farm Organization:
While this system is powerful, I’ve discovered some important constraints:
Search Radius:
Memory Limitation:
Mobility Restrictions:
Speed Considerations:
I design my storage rooms with these limitations in mind, keeping chest counts manageable and ensuring clear pathways for golem movement.
After extensive testing, I’ve developed optimal layouts for copper chest sorting systems. Here’s my proven approach:
1. Central Hub Design
2. Dedicated Sorting Zones
3. Pre Labeled Organization
Phase 1: Planning
Phase 2: Construction
Phase 3: Organization
Phase 4: Golem Assignment
Phase 5: Optimization
Through trial and error, I’ve identified pitfalls to watch for:
Overcrowding: Too many golems in one space causes traffic jams. I never use more than 4 golems in a single sorting room.
Excessive Distance: Chests beyond 32 blocks won’t be detected. Keep your system compact.
Blocked Pathways: Golems need clear walking routes. Avoid decorative elements that obstruct movement.
Insufficient Pre Labeling: Empty chests confuse the sorting algorithm. Always pre place sample items.
Door/Ladder Barriers: These stop golems completely. Design rooms with open entrances or permanent openings.
I use oxidation stages as visual indicators:
This color coding system helps me quickly identify chest importance without reading labels.
Double copper chests provide 54 slots but count as one chest to copper golems. I use double chests for:
However, I avoid double chests for item types with low quantities single chests work better for rare materials.
My most efficient systems use both chest types:
This setup maximizes golem effectiveness since they’re programmed to move items FROM copper chests TO regular chests.
Copper chests add beautiful visual variety to storage rooms. I incorporate different oxidation stages into my builds:
The green patina of oxidized copper complements many building palettes, especially with prismarine, stone bricks, or deepslate.
While copper chests don’t inherently interact with redstone like trapped chests do, you can build creative systems:
I’m experimenting with hybrid systems that use both copper golem sorting and traditional hopper sorting for maximum efficiency.
Let me break down when to use each chest type:
| Feature | Copper Chest | Regular Chest |
|---|---|---|
| Storage Capacity | 27 slots (54 double) | 27 slots (54 double) |
| Crafting Cost | 8 copper ingots + 1 chest | 8 planks |
| Golem Interaction | Source container | Destination container |
| Oxidation | Yes (4 stages) | No |
| Visual Variety | High (multiple colors) | Low (wood types only) |
| Best Use Case | Input/sorting stations | General storage |
| Mining Tool Required | Stone pickaxe+ | Any tool/hand |
When I Use Copper Chests:
When I Use Regular Chests:
The key insight: copper chests and regular chests work best together, not as replacements for each other.
Since each copper chest requires 8 copper ingots, efficient copper farming becomes essential for large sorting systems.
Best Y-Levels for Copper:
I find the most copper mining at Y 48 in mountain biomes. A single mining session typically yields enough raw copper for 5-10 copper chests.
Mining Efficiency Tips:
Each copper ore drops 2-5 pieces of raw copper. To create copper ingots:
Pro Tip: Blast furnaces smelt copper twice as fast as regular furnaces. I always use blast furnaces for large copper processing jobs.
Beyond mining, you can obtain copper from:
However, mining remains the most reliable copper source. I’ve never found these alternatives sufficient for large scale copper chest production.
Understanding storage math helps plan efficient systems:
When planning my storage rooms, I calculate backwards:
This approach ensures my storage never runs out of space unexpectedly.
Copper chests function similarly across Minecraft versions, but there are some platform differences:
If you’re on Bedrock Edition and copper chests aren’t available yet:
Warning: Experimental features may have bugs. I recommend using test worlds first before enabling on main worlds.
Through my extensive testing, here are solutions to frequent copper chest problems:
Symptoms: Can’t craft copper chest even with materials
Solutions:
Symptoms: Items sit in copper chest, golems idle
Possible Causes & Fixes:
No Matching Chests:
Out of Range:
Pathway Blocked:
Golem Oxidized:
Cause: Broke with wooden pickaxe or hand
Prevention: Always use stone pickaxe or better
Recovery: Contents should have dropped collect items from ground
Fast Oxidation:
Slow Oxidation:
No, the copper chest crafting recipe is locked until you create your first copper golem. When the golem spawns, it generates a copper chest beneath it. Break and pick up this chest to permanently unlock the crafting recipe in your recipe book.
No, copper chests have identical storage capacity to regular wooden chests 27 slots for a single chest and 54 slots for a double chest. Their advantage isn’t in capacity but in their automation potential when paired with copper golems.
Yes, hoppers work normally with copper chests. You can place hoppers underneath to extract items or above to input items. However, this somewhat defeats the purpose of using copper golems for sorting. I typically use hoppers with copper chests only in hybrid automation systems.
Nothing items remain completely safe regardless of oxidation stage. Oxidation only affects the chest’s appearance, not its function. I’ve stored valuable items in fully oxidized copper chests without any issues.
Yes, copper golems interact with copper chests at any oxidation stage. Waxed or oxidized chests work identically to fresh copper chests for sorting purposes. The visual change doesn’t impact functionality.
No, any stone pickaxe or better tool will properly mine copper chests and preserve both the chest and its contents. Silk Touch isn’t necessary the chest drops normally with standard pickaxes.
Yes, copper chests function in all dimensions. However, copper golem sorting systems work best in the Overworld where you typically maintain your main base. I’ve experimented with Nether copper chests they work but are less practical without accessible regular chests nearby.
I recommend 1-2 copper golems per copper chest for optimal efficiency. More than three golems in a single area causes congestion. For large sorting systems with multiple copper chests, assign dedicated golems to specific zones rather than having all golems service all chests.
No, copper chests cannot be dyed. Their color changes only through natural oxidation (orange to green) or by waxing at specific stages. If you want visual variety, use different oxidation stages or combine copper chests with regular chests of various wood types.
Yes, copper chests emit redstone signals through comparators based on fullness, exactly like regular chests. This allows integration with redstone contraptions for storage monitoring or automated alerts when chests fill up.
Here are my top strategies for optimizing copper chest systems:
1. Pre Label Everything Before dumping random items in copper chests, set up your destination chests with sample items. This saves golems significant search time and prevents misplaced items.
2. Use Item Frames Place item frames on regular chests showing what belongs inside. This helps both you and the golem sorting system visual organization benefits everyone.
3. Dedicate Zones Don’t create one giant storage room. I divide my base into specialized sorting zones:
Each zone has its own copper chest and 1-2 dedicated copper golems.
4. Wax Strategically Not all copper chests need the same treatment:
5. Upgrade Gradually Don’t convert your entire storage system at once. I started with one copper chest and two golems, then expanded as I saw benefits. This approach lets you learn the system without risking your entire inventory organization.
6. Combine Systems Copper golems work alongside traditional redstone sorting. I use:
7. Monitor Golem Oxidation Check your copper golems regularly. When they reach maximum oxidation, they become immobile statues. Keep axes handy to restore functionality or preemptively wax golems in critical sorting areas.
8. Build for Expansion Leave empty space in your sorting rooms. As new items are added to Minecraft through updates, you’ll need additional storage. I always include 30% extra chest capacity in my initial designs.
Since you’re investing in copper chests, consider expanding your copper infrastructure:
Copper Armor and Tools:
Copper Torches:
Copper Lanterns:
Copper Doors and Trapdoors:
Copper Grates and Bulbs:
I’ve built entire bases around copper as the primary material:
The aesthetic is stunning the orange to green gradient creates visual depth, and the entire base feels cohesive and intentionally designed.
Based on Minecraft’s update patterns, here’s what I anticipate for copper chests:
Additional Oxidation Mechanics: Mojang may introduce more oxidation interactions, perhaps special properties at certain stages or new ways to manipulate the aging process.
Golem AI Improvements: The copper golem sorting algorithm might receive updates for:
Recipe Variations: Future updates could add:
New Copper Items: The Copper Age update hints at ongoing copper expansion. Watch for:
The Minecraft community has requested:
Mojang actively listens to player feedback, so some of these features may appear in future updates.
In conclusion, learning how to make a Copper Chest in Minecraft adds both functionality and creativity to your gameplay. This unique storage option not only enhances your base design but also helps organize resources efficiently. Whether you’re a casual builder or a survival enthusiast, crafting copper chests can level up your Minecraft experience. If you’re in India and worldwide, this guide ensures you can easily follow the steps and enjoy smarter storage solutions.